
Property Nerds® / Strategic preparation
Staging Mid-Century Modern Homes
Every room should answer a buyer’s question.
Our staging lens: preserve the architecture, make the floor plan legible and remove avoidable distractions. This guide connects each preparation decision to a specific buyer question—so the furniture, budget and photography support one coherent selling strategy.
Eric & Janelle Boyenga · Boyenga Team
The Property Nerds® approach / Diagnose before decorating
Give every staging decision a job.
Start with a question a buyer might ask: “Will our furniture fit?” “Where would we eat?” “How private does the glass feel?” Then choose a presentation change that helps answer it. This is a planning framework, not a formula for predicting a sale price.
What makes this home itself?
Identify the strongest three architectural features: perhaps an atrium arrival, a long garden view and original wood ceilings. Record which furniture or decorative elements currently obscure them. Those features become the visual priorities for the walk-through and photo sequence.
Where does a buyer have to guess?
Walk the home as someone seeing it for the first time. Look for ambiguous room uses, crowded circulation, competing focal points and furnishings that distort scale. Separate those presentation problems from physical condition concerns that require professional evaluation.
What is the smallest useful intervention?
Try editing and rearranging before renting more furniture. Prioritize changes that improve several views or clarify a principal living space. Request written costs for optional work and consider disruption, completion risk and rental duration alongside the visual benefit.
Does the room now explain itself?
Revisit the same doorway and photography angle after installation. Check the route through the room, visible architecture and intended use. If the original question is still unanswered, revise the arrangement before adding accessories.
The staging decision matrix
| Buyer question | Presentation response | How to check it |
|---|---|---|
| “Is the living room too small?” | Replace an oversized sectional with appropriately scaled seating; reduce duplicate side tables. | Walk to the patio without detouring; verify the arrangement against actual room measurements. |
| “What is this atrium for?” | Create one usable seating or garden composition and clear the entry route. | The outdoor room has a clear purpose from the front door and adjoining interior. |
| “Where does the dining area belong?” | Place a proportionate table within the open plan and coordinate it with the living area. | Chairs pull out comfortably and circulation remains practical. |
| “Does this original interior feel dark?” | Clean glass, edit tall obstructions and introduce suitable task lighting before proposing finish changes. | Review daylight and evening conditions; keep original materials visible. |
| “Is there enough storage?” | Organize existing storage and remove excess belongings without concealing its dimensions. | Buyers can inspect usable storage; photographs do not imply space that is absent. |
Three priorities before the first dollar is committed
- Address: condition concerns, necessary professional evaluations and agreed repairs. These have a different purpose from decoration.
- Clarify: room function, furniture scale, circulation, light and important architectural views.
- Refine: art, textiles and accessories after the layout works. Keep optional refinements separate in the proposal.
Use the same property facts across the preparation plan, photographs and listing narrative. A beautifully staged room should strengthen an accurate description of the home.
01 / Start with the house
Staging an Eichler starts with what is already there.
Post-and-beam structure, broad glass walls, atriums and a close relationship to the garden give many Eichler homes their character. Other mid-century homes may express those ideas differently. The staging plan should respond to the actual floor plan, natural light, condition and original details of your property.
Buyers need to understand both the architecture and everyday use: where a sofa belongs, how a dining area connects to the kitchen, and how people move from indoors to outside. Staging gives those spaces a readable purpose. It does not replace accurate pricing, repairs, inspections or disclosure.
Keep the long view open
Look from the front door toward the principal living space and garden. Remove unnecessary pieces that interrupt that view. Choose lower-backed seating where it helps reveal glazing, beams and outdoor space, while keeping a comfortable route through the room.
Use warmth with restraint
Balance quiet upholstery with wood, woven textures and a limited accent palette. Black can define a shape; orange, rust or olive can provide a controlled focal point. Let the existing finishes determine the colors rather than forcing every room into the same theme.
Choose scale before style
A celebrated furniture design is still the wrong choice if it blocks a door or overwhelms a compact room. Measure the room, entry route and furniture before installation. Leave practical clearance for opening doors, pulling out chairs and walking to sliders.
Preserve distinctive materials
Evaluate original paneling, ceilings, doors and cabinetry before painting or replacing them. Clean and repair suitable surfaces first. Ask an appropriate specialist about unfamiliar finishes or damaged materials; staging should never conceal a condition issue.
02 / A room-by-room plan
Make every space understandable.
A clear welcome
Clean the entry door, hardware, lighting and adjacent glass. Simplify planters and keep the approach clear. Where there is an atrium, show it as a usable outdoor room with a restrained seating arrangement or one sculptural planting focal point.
Keep access routes, drains and thresholds unobstructed. Replace tired movable accessories before proposing permanent alterations. Buyers should recognize the transition from street to private living space without navigating an obstacle course.
Frame the view
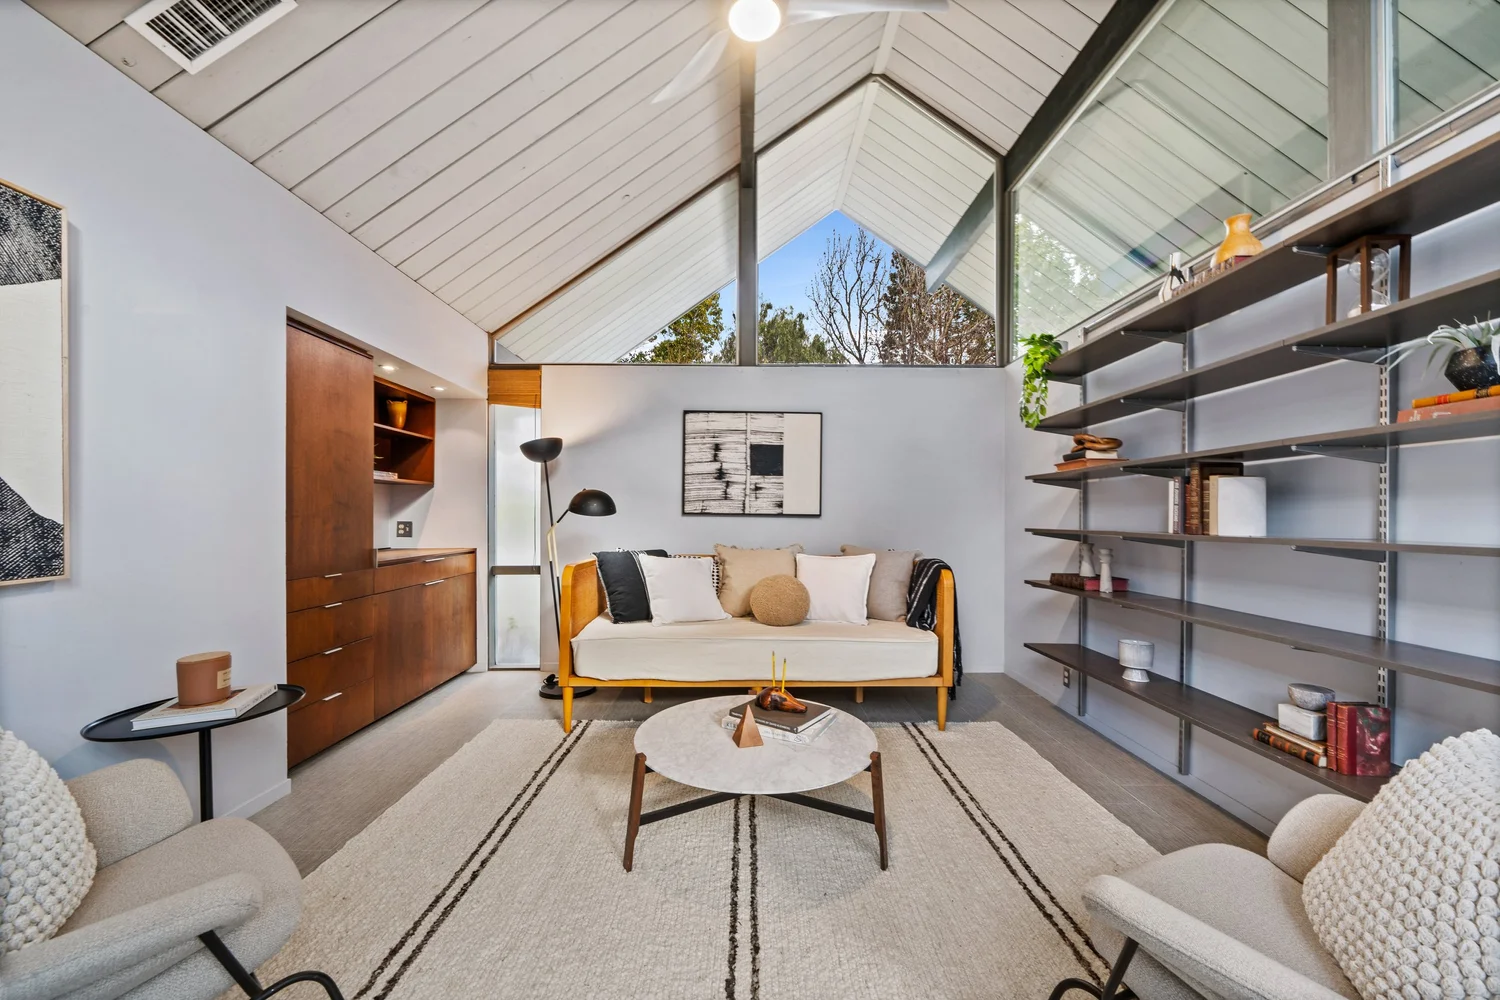
Arrange the main seating group to acknowledge the view, fireplace or other existing feature. A sofa and a pair of appropriately scaled chairs often communicate the room more clearly than several unrelated seating areas. Test the arrangement from both the entry and the principal photography angle.
Use a rug to connect the conversation area without covering all of the flooring. Keep floor lamps, plants and tall shelving away from important glazing. Edit tabletop objects so a buyer can see usable surfaces.
Show a comfortable gathering place
Select a table proportionate to the room and its circulation. Pull out a chair to test the real clearance. A simple centerpiece and a restrained pendant, where already appropriate, can identify dining space within an open plan.
Avoid oversized place settings or a table extension that makes the space feel tight. Coordinate the dining and living palettes so adjacent spaces read as one coherent home.
Make the work surfaces visible
Deep-clean cabinetry, counters, appliances and lighting. Remove most small appliances, paperwork and refrigerator displays, leaving only a few useful, attractive items. Organize accessible storage without suggesting that belongings have simply been pushed out of sight.
Separate styling decisions from renovation decisions. A functioning original kitchen may benefit from careful presentation; an alteration needs its own cost, timing and condition review. Do not undertake a rushed remodel solely to match a staging palette.
Give each room one clear role
Use a bed size that leaves a convincing route around the room. Simple bedding, coordinated bedside lighting and a limited art selection make the proportions easier to read. Keep windows and closet access clear.
Choose a primary purpose for a secondary room: guest room, office or another use appropriate to the property. Avoid combining so many functions that none feels workable. Describe a room accurately; furniture does not establish legal bedroom status.
Clean, calm and practical
Present clear counters, clean mirrors and fresh towels. Remove daily toiletries for photography and showings. Check that bulbs work and that the room is comfortably lit without mixing noticeably different light colors.
Have leaks, damaged surfaces, ventilation concerns and other condition issues evaluated separately. Styling is a finishing step after necessary work, not a way to cover deterioration.
Continue the room outside
Arrange outdoor seating where it can be understood through the main glass wall. Repeat a material or color from indoors to connect the spaces. Clean furniture and hardscape, edit unused pots and attend to routine landscape maintenance.
Keep the garden believable to maintain. Preserve clear paths and access to equipment. Pools, steps and other safety considerations need appropriate attention independent of the staging plan.
One deliberate layer
Use art to reinforce scale and color without covering significant architectural details. Secure it appropriately and avoid mounting into original surfaces without a considered plan. Choose a few substantial objects over many small accessories.
Review the house in daylight and after dusk. Clean glazing, control distracting reflections and use suitable lamps where corners feel dim. Do not remove privacy solutions a seller needs simply for a photograph; plan temporary adjustments for the shoot.
03 / Choose the right scope
Occupied, vacant or selectively staged?
The appropriate approach depends on your furniture, moving schedule, room proportions and the condition of the home. Full staging is one option. A focused edit can be appropriate when existing pieces already work well.
| Approach | What it involves | Questions to resolve |
|---|---|---|
| Occupied staging | Edit and rearrange your furnishings; add selected art, lighting or accessories. | What moves to storage? What remains usable day to day? Who resets rooms before showings? |
| Vacant staging | Install a coordinated furniture package after the home is empty and preparation work is complete. | Which rooms are included? How long is the rental? Who handles access, insurance, removal and extensions? |
| Partial staging | Prioritize the principal living areas and selected rooms that need help communicating their purpose. | Will unstaged areas still present clearly? How will the entire photography sequence feel consistent? |
| Virtual staging | Add clearly identified digital furnishings to suitable photographs. | How are altered images labeled? Are original views available? Does the in-person condition match expectations? |
A useful proposal identifies rooms, furnishings, installation, rental term, extension fees, removal, damage responsibility and exclusions. Review those details before committing.
04 / Prepare with purpose
Build the budget around the decisions.
Separate three workstreams
- Condition and required work: identify items that need evaluation or repair by qualified professionals.
- Presentation: cleaning, decluttering, landscape maintenance and carefully selected cosmetic work.
- Staging and media: furniture, accessories, installation, rental, photography and removal.
Ask for written estimates and identify who approves changes. Account for storage, moving, cleaning after work and rental extensions. There is no universal staging budget or guaranteed return; the scope should fit your property and selling plan.
Before replacing distinctive original features, compare preservation, repair and replacement options. A visually dramatic project may add more complexity than a focused preparation plan needs. Use the repair-or-replace worksheet to record the feature, its role, the evidence you have and the questions a qualified professional needs to resolve.
A practical order of operations
- Walk-through: document existing conditions, architecture, furnishings and priorities.
- Scope: decide what stays, moves, needs evaluation or requires a vendor estimate.
- Preparation: complete agreed work, move excess belongings and deep-clean.
- Installation: place furniture, art and lighting; check circulation in person.
- Media review: finalize styling for photography, floor plans and listing materials.
- Showings and removal: maintain presentation and coordinate removal with the selling schedule.
Set dates after confirming vendor availability and the actual work required. Build in time to resolve unfinished items before photography rather than relying on a last-minute correction. Before requesting proposals, use the Keep / Change / Verify project brief to give each professional the same preparation priorities and open questions.
Discuss preparation priorities with the Boyenga Team alongside your broader Eichler selling strategy. For project ideas, explore before-and-after renovations.
05 / From photographs to the showing
Present the same home buyers will visit.
Good presentation should make the layout easier to understand. Plan photography around the home's light, principal views and sequence of rooms. Include the connection between living space and garden, and retain enough context for buyers to understand scale.
Before the photographer arrives
Finish cleaning and installation first. Remove personal documents, family photographs and visible valuables. Tidy cords, straighten rugs, align furniture and check reflective surfaces for clutter. Confirm which window coverings should be adjusted and which exterior areas are ready.
Prepare a short shot list of meaningful features, such as the atrium, ceiling structure or a restored detail. Avoid describing a feature as original or restored unless its history is supported.
Keep digital presentation honest
Clearly identify virtually staged images and retain unaltered views where appropriate. Digital furniture should not disguise damage, remove permanent obstructions or suggest completed improvements that do not exist. Review the final listing images against the actual property.
Maintain the same room arrangement during showings where practical. If furniture changes or staging is removed, update expectations so the online presentation remains useful.
06 / Your preparation checklist
Ready for the first showing?
Use this checklist during your walk-through. Selections last for this page visit; no information is submitted.
0 of 12 preparation items checked
07 / Seller questions
Mid-century staging, explained.
How is staging a mid-century modern home different?
The furniture plan should respond to the home's structure, proportions, glazing and indoor-outdoor connections. Keep distinctive architectural features visible and give open areas clear uses. The result should feel livable and coherent with the home.
Do I need authentic vintage furniture?
No. Scale, condition and composition matter more than owning collectible pieces. A thoughtful mix of contemporary furnishings and selected period-inspired shapes can support the architecture. Avoid turning every room into a themed display.
Should I paint original Eichler wood paneling?
Evaluate its condition, significance and repair options before making an irreversible change. Original materials can be an important part of the home's identity. Discuss preservation and preparation with professionals familiar with the material and your selling goals.
Can I live in my home while it is staged?
Often, an occupied staging plan can work around daily life. Agree on what furniture remains available, what must be stored, and how rooms will be reset before showings. Consider pets, work routines and access needs when setting the plan.
Which rooms should I prioritize?
Start with the arrival experience, principal living area, dining space and main bedroom, then consider rooms whose purpose is unclear. In a home with an atrium or strong garden connection, the outdoor presentation deserves attention too. Final priorities depend on the actual property.
How much does staging cost?
Costs vary with the number of rooms, inventory, access, occupied or vacant condition, rental duration and preparation required. Request a property-specific written proposal with installation, extensions and removal clearly addressed. Avoid applying a generic price or promised return to your home.
Does staging guarantee a higher sale price?
No. Staging can help buyers understand the spaces and improve presentation, but sale results also depend on pricing, condition, location, competition and market conditions. Treat staging as one part of the selling strategy.
Should I renovate before staging?
Assess condition issues first, then compare the cost, time and likely usefulness of proposed improvements. Some homes need targeted preparation; others require more substantial work. Staging and renovation are separate decisions, and neither should be used to hide defects.
How does the Boyenga Team help me get started?
Schedule a conversation with Eric and Janelle to discuss your home, moving plans and intended timing. Request a walk-through and a clear preparation plan, including which services and vendors are proposed. Confirm scope, costs and responsibilities before work begins.
Property Nerds® / Boyenga Team
Start with a strategy walk-through.
Bring Eric and Janelle Boyenga your moving timeline, the rooms you are unsure about and any planned improvements. Ask for a preparation brief that identifies the home’s defining features, the buyer questions to answer, recommended work, optional work and the sequence to launch.